
![]()

On the second of august, Masisa published through facebook the names of the six semi-finalists of the furniture contest “Designing the Future”. I, Diego Leon, am one of them. I was notified on the first of august and it was a grand birthday present for me. Congratulations to the six projects and their designers!
1. Arturo Gutiérrez (PUCP) y Melissa Galindo (Toulouse Lautrec)
2. Christian Henriod (PUCP)
3. Arturo Loro (Universidad privada del norte)
4. Diego León Vivar (PUCP)
5. Edgar Fernández (PUCP)
6. Paulo Samanez (PUCP)
Now, these six finalists enter an internal contest through facebook. He or she that gets the most “likes” gets to win an Ipad. Enter and vote for the one you like best and share them with people that you know so that they can see them as well and participate. You have until the twentieth of august to vote. Congratulations!
* Link for vote: Masisa Perú
**Yo can also vote for Participes:
![]()
It’s been a while since I’ve wanted to make a point of the design process of a certain product and now I am going to take advantage of this opportunity to show you my final offer for this contest. Above all, my focus will be to show you the process by which I arrived to get to it.
I present you with: PARTICIPES, participative chairs for children in their first years of school.


This was my offer. Now, let’s look at why these are this chair is a piece of furniture of the future.
*The design always has a method. Everyone else may have a different one, but there’s always an order.
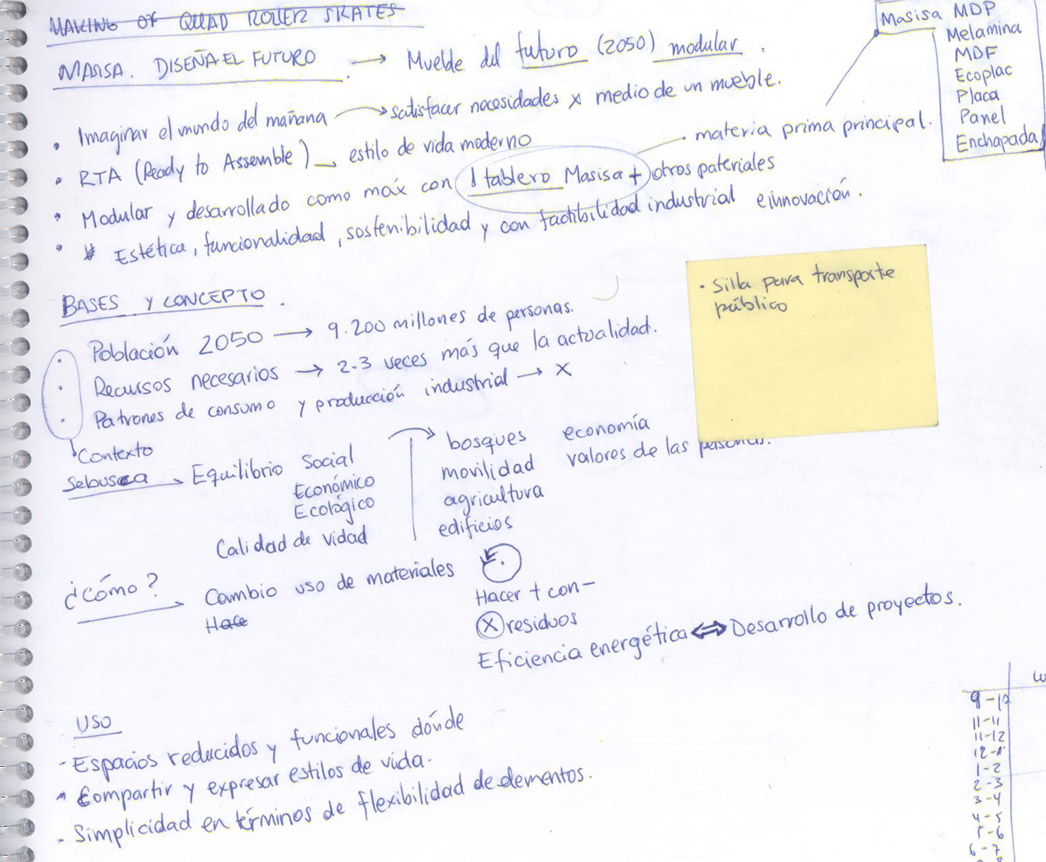
To begin with, as with any project, it is necessary to know what the client, in this case Masisa and its jury, wants. For this purpose, I have read well all the conditions and made this short summary of what I thought would be of most importance.
The furniture of the future, projected for 2050.
*You may click on any image to see it more clearly if you wish.
Once I understood what was required, I set out to find those who would use my furniture. For this, I began to think about the needs that people in the year 2050 might have.

This I did with children, adolescents, middle-aged adults and senior citizens.
The first idea that I had was to create a type of armchair for a “pop-up cinema”, but I quickly realised that the important thing about this project would be the support of projection.
After running it over in my mind, it came to me that preschool and school children would need a new type of furniture, one that would be more open to a new educational system.
Therefore, as I already had my user and topic, the investigation of the case began.

With this investigation I realised that I was on the right track, despite the fact that this has been previously proposed and some countries have even begun to change the structure of schools. Classrooms will take on forms of the like we have not seen before. I show you an image of what I have found.

While being a small image, we can still discern a difference from what we are accustomed to. Classrooms are much more spacious, where the previous separation between different age groups no longer exists, where it is a lot more possible to interact with the rest of the students and space.
* Fielding Nair International is a company of architects and agents of change in Education. They design projects of this type. Click on the above image to link to their website. It is then that I begin to sketch offers of furniture that would go with this new concept of education, of participation between students and space.

*The following images are from my notebook and I will try in as much as possible not to modify them or touch these up so that I can bring you as close as possible to my design process. Anyhow, it will be necessary for me to attach a few drawings so as not to go beyond my scope with this note as well as leave out or erase any information which might be considered irrelevant.
While working on this board, I realised that it was more important to help the child to adapt and get around so that this interaction can take place, so I decided to design a chair that would suit this purpose.

One idea that came to me was to use a seat with minimal structure and material in which the child would end up giving form and function to the object. What detained me from pursuing this concept was realising the force it would take on the part of the child to keep seated in the same place; it would simply not allow him/her to concentrate.
*I also a fairly similar seat, the “Symbiotic Chair” by “Studio Humunculus”.

After continuing to work, I came to the idea that I would develop until the very end.

In the end, it would turn out to be a chair with wheels and a support with an integrated table that would permit the child to move around in the classroom, take notes in any part of the space, form work-groups with other students or simply use it the conventional way. This is the way that Participes began to take shape.

While in the stage of sketches and offers, I begin to look for many images of similar products – firstly, so as not to repeat the same idea and, secondly, to be able to improve the aspects of the similar products. I show you here a few of the lines where I took my information from.

Other sketches of the process.


Now, with the ideas set, it was necessary to look for anthropomorphic data (measurements of the human body) of children and to that I had to fixate on an age range. The age range that I focused on was between 6 and 8. I found a few Columbian anthropomorphic tables. I used these due to the fact that here in Peru we have none and the fact that we are anthropomorphically similar.


This is what the tables are like: they include the measurements of both males and females between the ages of 5 and 10. Due to the fact that my chair is designed for children between the ages of 6 and 8, it should be comfortable for the average small 6 year old girl as well as the average big 8 year old boy.
In order to give dimension to the chair with these measurements, I used an autocad plan. I created the users using the proportions of the tables.

Exploration of the constructive.

Having solved the design and advanced with the constructive part of the same, I begin with the modeling in 3d. For this occasion, I used “Inventor Pro” (another autodesk program similar to autocad and 3d max).
With inventor, you can construct the parts separately and assemble them in the end. This allows you to see the construction process more clearly.

At this stage, the design is ready for a prototype to be made. Necessary tests must be taken to see if indeed the design meets the functions we set out to meet and if the constructive planning was correct and viable.
It is always necessary to show the client all the characteristics of the product. That is why presentation pamphlets need to be made, along with explanation of its concept, function, form and technical aspects. For this I went back to my sketchbook/notebook and made a diagram of the pamphlets/sheets to be made.

For this part, Renders must be generated. Renders are photographic-like images taken from the 3d. For this, I used “3ds Max”.

Another program I used for the assembly was “Keyshot”. This is a simple to use real-time rendering program.

After this, comes the composition of the sheets, previously designed by paper and pencil. For this stage I use graphics programs, specifically “Illustrator” and “Photoshop” by Adobe.

And that’s it! I export the presentation to pdf format, take out the construction plans from Inventor and send them as well.
 +
+
This is only a general plan. An “exploded diagram” plan and an assembly plan need to be attached so that everything is clear at the moment of assembly.
To conclude, I include here the sheets which I presented in the contest.


_____________________________________________________________________________
So far, this has been my participation in the Masisa “Design the Future” contest. I normally work this way.
As you can see, we designers don’t work miracles. Often, people don’t know what the work behind a drawing or rendering is like. It is not easy, it is not quick—it takes a lot of work and money, but it is fun and gratifying.
I hope that more than one of you has finished reading this to the very end. I know that I did lengthen a bit more than I had planned, but I’m sure that it might have interested more than a few of you, which is why I chose to do so.
Now it’s time to vote for your favorite work! Congratulations once again to rest of the designers and contestants and onward to share our work!
I leave you here with the link to my project in the contest so that you “like! it and vote for it! Success to all the semi-finalists!
PARTICIPES / Masisa Peru
Text translation from Spanish to English: Shai Shawn Tal.
Thank you very much.

![]()
